Stream Processing Using RabbitMQ
Stream processing is a messaging pattern where "producers" emit events to a stream and interested "consumers" or "listeners" can subscribe to the events without the producer having to be aware of who's listening, and the consumers don't have to care where the messages are coming from.
This setup allows us to decouple various components in our system and provides for a nice, consistent pattern of messaging between services.
I'm not going to go into too much detail on that here, there have been many posts written on the subject already (here's a really good one).
This post is is going to show how this style of architecture can be implemented using .net core and RabbitMQ.
The goal isn't to create a real world example, just to show how to implement a fanout exchange as simply as possible.
RabbitMQ
Short for Rabbit Message Queue, it's an open source message broker that we can use to facilitate communication between services in our system. There are a bunch of great tutorials on the different messaging patterns RMQ can be used to for, we're going to be focusing on the "Publish/Subscribe" pattern, which uses the fanout style exchange.
To follow along with this post you're going to need to have an instance of RabbitMQ running so that we can send events to it, you can find installation instructions here.
If you're running docker you can enter
docker run -it --rm --name rabbitmq -p 5672:5672 -p 15672:15672 rabbitmq:3-management
To spin up a new RabbitMQ server @ http://localhost:15672
The default credentials for this image should be guest/guest.
Feel free to poke around the tabs, there shouldn't be any activity but you can see that RMQ starts off with a number of default queues and the overview tab is nice.
Overview

Default Exchanges

DotNet Core
For this demo we'll be using .net core 3.1 which, as of this writing, is the latest version of .net core, you can grab that here.
The Producer
First we're going to build a really simple service that generates "Orders" for our client services to process. The order producer will contain
- A list of inventory that it's allowed to order
- A timer that is used to generate a new order for a random item with a random quantity every 1 second.
- An event publisher, a helper class that pushes new order messages to the fanout exchange.
Create a new asp.net core project in visual studio
I like to use asp.net rather that straight .net core for my services because in my day to day work I usually want my services to have messaging capabilities and http accessibility. It makes it really easy to add things like swagger, health check endpoints, etc. All things that we don't need for this demo, but all pretty handy if you want to make a production microservice.

After you finish naming everything and move to the next screen, select empty project and click Create.
This should leave you with a single solution project that looks something like this:

The first thing I usually do is rename Program.cs to something more meaningful, like OrderProducerService.cs this should rename your class as well.
Edit your project file and add the following package references to the <ItemGroup/> tag.
<PackageReference Include="Newtonsoft.Json" Version="12.0.3" />
<PackageReference Include="Polly" Version="7.2.0" />
<PackageReference Include="RabbitMQ.Client" Version="5.1.2" />
<PackageReference Include="Serilog" Version="2.9.0" />
<PackageReference Include="Serilog.Sinks.Console" Version="3.1.1" />
Update your appsettings.json file to include this new section containing rabbitmq connection information.
{
  "Logging": {
    "IncludeScopes": false,
    "LogLevel": {
      "Default": "Warning",
      "System": "Information",
      "Microsoft": "Information"
    }
  },
  "RabbitMQConnection": {
    "HostName": "localhost",
    "UserName": "guest",
    "Password": "guest",
    "Port": "5672",
    "Exchanges": {
      "Fanout": "orderfanout"
    }
  }
}
Next, create some data model classes, Product
using System;

namespace DomainModel
{
    public class Product
    {
        public Guid Id { get; set; }

        public string Name { get; set; }

        public string Emoji { get; set; }
    }
}
and Order
using System;

namespace DomainModel
{
    public class Order
    {
        public Guid Id { get; set; }

        public DateTime? OrderDate {get;set;}

        public DateTime? CancelDate { get; set; }

        public DateTime? ShipDate { get; set; }

        public int Quantity { get; set; }

        public int OrderNumber { get; set; }

        public Product Product { get; set; }
    }
}
Event Publisher
This class does the work of connecting to RabbitMQ and pushing messages to the fanout exchange. All of the connection setup is done in the constructor.
The PublishOrderCreatedEvent method is used to push events to the exchange, we can use the name parameter to push different named events to the exchange to make it easy for participating queue listeners to disregard messages that don't concern them. In this example we're only using one event, "order.created" but you can easily imagine many different event types, "order.processing", "order.processed" etc.
The important bit happens when we build the message to be passed to RabbitMQ, we have to provide it with the name of the exchange we wish to push messages to. Later, when we set up queues, they will have to be pointed at this exchange to receive messages.
Create a class called EventPublisher
Order Producer
Now we can go back to the order producer service and build the the timer and the random order generator that is going to push messages to our queue using the event publisher.
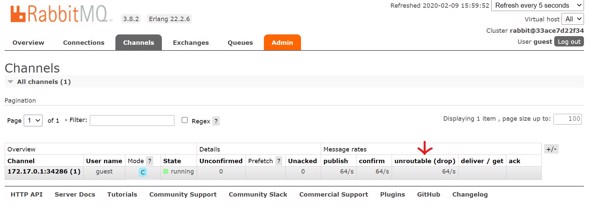
You should now be able to run the project and see activity on the exchange
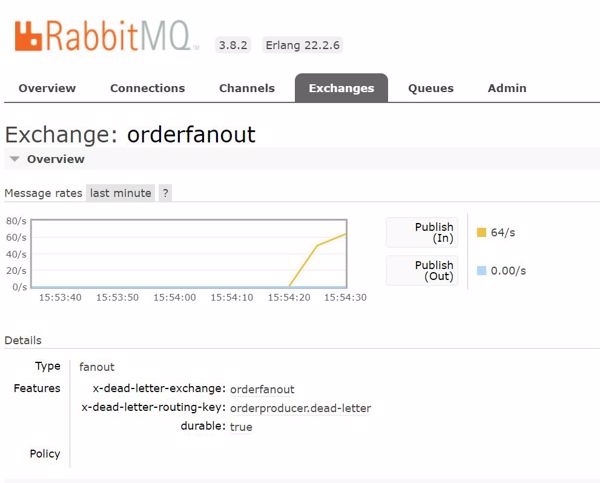
If you take a look at the Queues tab you should see that there aren't any, and on the channels tab you should see the one we just set up, note that all of the messages are being dropped because there isn't a queue connected to the exchange.
Let's do that part next.
The Consumers
Keeping it simple we'll have the following consumers:
Order Quantity Counter
- Monitors the quantity of each order and applies fizzbuzz for each order.
Large Order Alert Service
- Monitors the quantity of each order and sends an alert for any order over 25 items.
For the Large Order Alert Service create a new empty asp.net core project as before. Copy the appsettings.json and package references from the OrderProducer into the new project. Then rename the Program.cs file to LargOrderAlertService.cs.
Download the source here.
The consumer code is very similar to the producer, most of the main method is boiler plate for setting up the connection to the RabbitMQ server, the main difference is that when we connect to the exchange and bind to it, we pass the name of the queue that we want the exchange to pass our messages to:
string queueName = "largeOrderAlert";
Dictionary<string, object> queueArgs = new Dictionary<string, object>()
{
    { "x-dead-letter-exchange", exchangeName },
    { "x-dead-letter-routing-key", "orderproducer.dead-letter"}
};

Log.Information($"Listening to queue {queueName}");

channel.QueueDeclare(queueName, true, false, false, queueArgs);
channel.QueueBind(queueName, exchangeName, "", queueArgs);
channel.BasicConsume(queueName, true, consumer);
This way we can connect as many queues to the same exchange as we like, and they will all receive a copy of each message pushed to the exchange.
To see this in action open your favorite terminal and navigate to the OrderProducer's output directory and enter
dotnet .\LargeOrderAlertService.dll --urls=http://localhost:3999
Now, in another terminal window, launch the order producer:
dotnet .\OrderProducer.dll --urls=http://localhost:5111
Make sure you use different port numbers for each instance, you should see something like this:
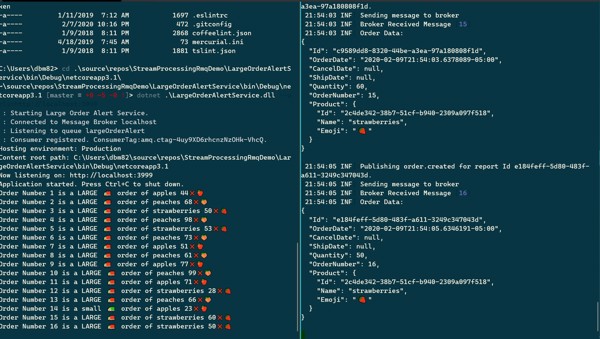
In my screen shot the consumer is on the left, and the producer is on the right.
If everything is working as expected, you should see for each order produced the consumer receives a message, determines whether it is large or small, and displays the result.
Now, what happens if we start up another instance of the consumer?
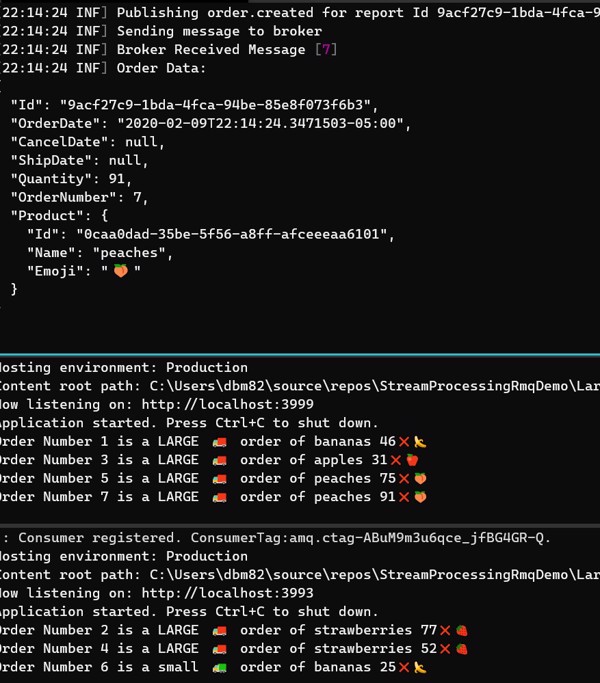
You can see that the consumers take turns responding to messages from the queue, this is the default behavior for RabbitMQ where multiple consumers are hooked up to a single queue. This is why the distinction between queues and exchanges is important. If you're trying to implement a fanout queue but you attach two workers to the same queue they will use round-robin scheduling.
For the last step we'll build one more consumer following the same steps as before
- New project
- Copy appsettings for RabbitMQ connection
- Copy package references
- Rename
Program.csto OrderQuantityCounterService.cs
Download the source here.
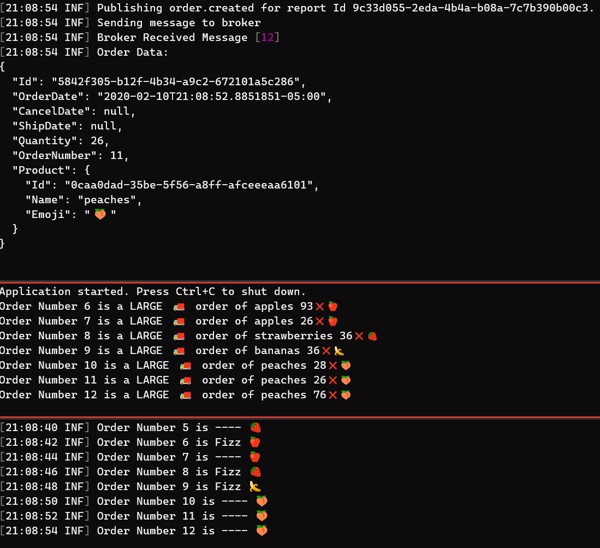
When you run all of these at once you should see the producer creating orders, and each of the workers respond to each message in their own way like the example pictured here:
Considerations
To keep things simple I tried to cut down on the normal boiler plate code that goes into microservices as much as possible. Combining them into a shared solution was another shortcut I used here that I wouldn't use in production. Event driven microservices, in my opinion, work best when they are as decoupled from each other as possible.
It's extremely tempting to share code in this situation, because as you can see from this example, a lot of the code is duplicated, but I think that temptation is best resisted to avoid having microservices that are dependant on one another in any way. In the two consumer services for example, you can see that I used the dynamic keyword to avoid having to import the Order class.
Another thing that's sort of glossed over is error handling, service degradation, security, etc. Those are all posts for another time, but definitely important for production microservices.